Healthy New Year


Make a healthy start to the New Year and grow something fresh and nutritious without having to leave your kitchen (apart from going to the gym of course). Sprouts and microgreens will give you a very literal 'kitchen garden' giving you attractive additions to a salad, extra crunch to a sandwich and lots of healthy, fresh food.
Microgreens
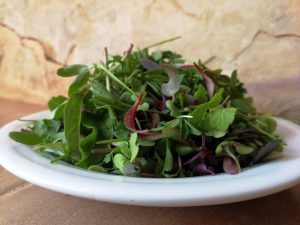
Microgreens are tiny edible plants that are older than a sprout, but younger than a full-grown plant. Microgreens are harvested after the first “true” leaves have developed. They need compost and light to grow. Like sprouts, they are a concentrated nutrient source and packed with beneficial enzymes because of their rapid growth. With the right kit, you can have a year-round vegetable source on your kitchen counter.
What are the best seeds for microgreens?
This depends on the leaf that you want in the end! All viable seed will grow into microgreens - but some are more colourful or have a spicy taste. Black Kale will give you lovely dark leaves while sunflower will give you bulk and a good textured leaf. The brassicas and mustards will give a hot spicy taste whilst peas will give you both that lovely fresh pea taste and attractive tendrils. You could also experiment with making your own mix. You should always use seeds from a reputable source, preferably organic.
What equipment do I need?
A good quality growing medium is essential – organic seed compost or hemp mats are both suitable. You will also need trays of some sort – either seed trays or small containers. You might need an additional light source in winter.
Getting started
- Soak the seeds for 6-12 hours. Rinse and drain well.
- Sprinkle the soaked seeds over a tray of compost and press down gently.
- Use more seeds than you would normally to ensure a good crop of leaves.
- Cover with a fine layer of compost.
- Keep compost moist (but not soaking). You should see signs of germination after about 6 days.
- Microgreens are best kept at a steady temperature of about 20°C
- Cut after about two weeks, or when you are happy with your crop!
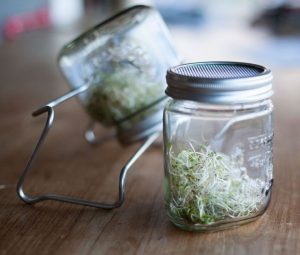
Sprouts
Sprouts are the tender shoots of germinating seeds. (Not to be confused with Brussel sprouts, that popular Christmas favourite beloved by small children). They are packed with protein, vitamins, enzymes and minerals. Most seeds, like peas, beans, grains and nuts can be sprouted. You should always use seeds from a reputable source, preferably organic. They should be fresh, clean seeds suitable for sprouting.
Equipment
You can sprout seeds in a jar with a ventilated mesh lid, in a muslin bag or in a sprouter. Sprouts like a light airy place away from a heat source. The kitchen windowsill or worktop is ideal. You also need to have access to clean fresh water for rinsing.
Getting started
- You will need about two teaspoons of small seeds or a tablespoon of the larger ones. The finished sprouts occupy a lot of volume so sprouting less is better to begin with.
- Check your seed for any debris that shouldn’t be there, especially small stones. Rinse thoroughly then soak overnight in clean fresh water.
- Drain and rinse again the following morning then put the soaked seed in your sprouting tray or jar.
- The seeds should be rinsed and drained a least once a day and placed somewhere with a light source.
- After one or two days (depending on temperature and seed size) you will start to see small sprouts emerging.
- Sprouts (again depending on temperature, light level and seed size) should be ready to eat in about 4/7 days.
- Sprouts are best eaten when small and delicate. Experiment with what you like best. You can have several different sprouts on the go at once. To ensure a regular supply soak and sprout successively. Rinsed and drained sprouts can be stored in the fridge for up to a week, so if time is short you could just do one batch a week and store them in the fridge to eat as you need.
Trouble shooting
- Sprouts must be well drained. The most common cause of failure is sprouts sitting in a puddle of water.
- Sprouts like good air circulation so don’t put the sprouter in a cupboard.
- Keep the sprouter clean for best results.